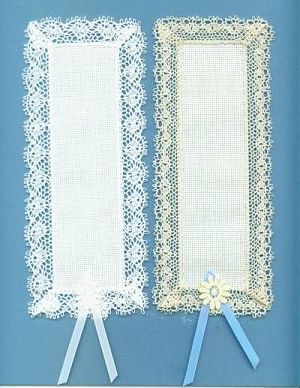
 Pre-finished bookmark forms from Charles Craft.
“How do I finish my bookmarks?” is hands down the question I hear most often from Bookmark Challenge stitchers. I propose we answer it.
First, for you new- and non-stitchers, “finishing” does not refer to finishing the decorative embroidery, but rather what you do after the embroidery is done. Depending on what the embroidery is stitched on, finishing might include adhering a backing, inserting into a ready-made sleeve or holder, attaching a “tail” to mark the page while the embroidery hangs outside the book, working an edge stitch, or some combination of these.
The possibilities really are endless, but they don’t have to be complicated. Finishing can be quick, simple, fun, and beautiful. I also happen to like slow, complicated, entertaining, and gorgeous options, but that’s me; you should do what pleases you. I think the most important thing to remember when finishing your bookmarks is that there are no rules. Anything goes, so don’t be afraid to try something untraditional or even downright odd. Just as we’re encouraging kids to try reading, I’m encouraging you to try finishing.
The most popular way to stitch a bookmark these days is to use a ready-made bookmark form, like those offered by Charles Craft and Jeanette Crews Designs. These forms have finished edges, so no edge stitching is required.
 Pre-finished bookmark forms from Jeanette Crews Designs.
If you embroider a pattern that is reversible, say a darning pattern or blackwork, absolutely no finishing is required once the thread tails are secured under stitches.
For cross stitch or other kinds of embroidery, you may want to cover the back side with something. No problem. One easy way to do this is to choose a no-fray fabric for the backing: felt, Ultra suede, faux leather, for example.
Cut a piece slightly smaller than the bookmark form so that the backing doesn’t show when viewing the bookmark from the front. You can use pinking shears or scissors with decorative edges if you’d like.
Spread white glue on the wrong side of the backing all the way to the edges–I find a small paintbrush handy for spreading the glue–and adhere to the back side of the embroidered bookmark. Allow to dry completely.
There it is: totally easy and beautiful.
Come back next week for another Bookmark Tip!
Categories: Crafting, Funk & Weber Designs, Needlework


1 reply »